Snipping on Mac is a reliable activity to capture the screen of your Mac, no matter; whether it is the entire screen, a specific part, a screenshot of a video, etc we know, that desktop Windows has a built-in snipping tool, and the users move from Windows to Mac find it difficult, how to snip the screen, because Mac has not official snipping tool. Apple has tried to fix the issue and offers multiple alternatives of Windows snipping tools for macOS.
In our post, we will discuss the different in-built ways of taking screenshots on Mac, and we also give you a list of some popular alternative snipping tools for Mac.
Why We Need Snipping on Mac?
In our online communication showing anything is easier than describing. So Snipping tool is the best solution to share visual material with your friends and colleagues using the Mac’s screen. Here are some features that show the importance of using of snipping tool;
- Capture your screen, no matter how many parts.
- Annotation tools
- Edit the basic parts.
- Integration with clipboard.
- Save in your preferred location and share quickly.
How to Snipping on Mac
Now we will discuss some built-in methods of taking screenshots on Mac using the snipping tool, and next, we will give details of some best alternative snipping tools for Mac.
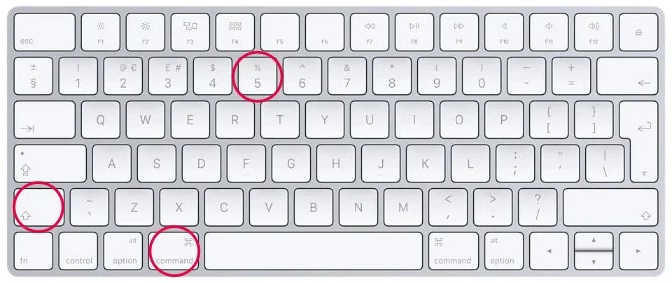
1. Press Shift + Command + 5
2. Press Shift + Command + 4
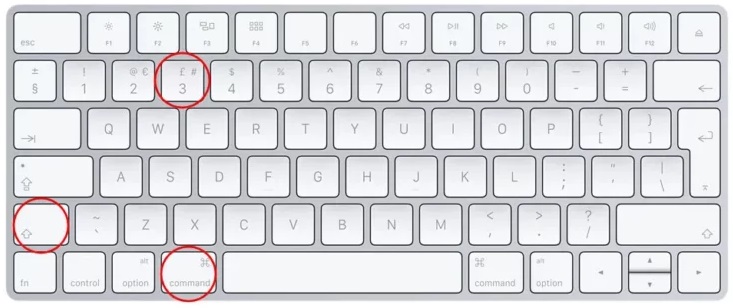
3. Press Shift + Command + 3
4. Shift + Command + 4 + Space
Method 1: Use the Control Panel to Snipping on the Mac
- Launch the control panel of the snipping tool by pressing the Shift + Command + 5.
- At the bottom of the screen, the control panel pops up with several options to capture the screen.
- Take full screenshot
- Take a screenshot of an active Window
- Take a screenshot of any specific part
- Take a screenshot of the full video recording screen
- Take a screenshot of any specific part of the video recording screen
Simply select the option you require, click it, capture the screen, and it will be saved to the clipboard.
Method 2: Use Options to Snipping on Mac
You can capture the screen of a Mac without going to the control panel of the snipping tool such as;
- On the main window, three buttons are available next to the Mac Snipping tool that allows the users to capture the screen as they want.
- The first button is for taking screenshots of the entire screen,
- The second button offers the selected Windows capturing option.
- The third dashed rectangle button is for capturing the selected part of the screen.
- You can check it by hovering the cursor on the buttons that each button performs.
- Likewise, you can take screenshots of the entire screen of a video using one of the next two buttons, and the second enables you to record a specific part of the video.
Method 3: Use Keyboard Shortcuts to Take Full Screenshots on a Mac
- Press Shift + Command + 3 keys simultaneously from your keyboard.
- Click on the small thumbnail preview icon in the bottom right corner to edit the screenshot when you take it.
- The screenshot will be saved to the clipboard automatically.
- It is possible to enable/disable the auto-saving ability from the screenshot menu.
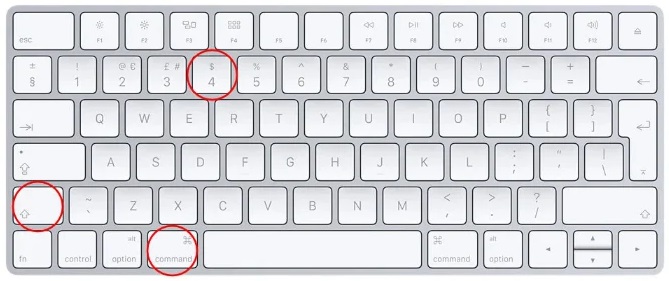
Method: 4 Use Keyboard Shortcuts to Take Screenshots of Specific Parts on Mac
- Press Shift + Command + 4 keys from the keyboard simultaneously.
- Open the Snipping tool on your device.
- Use the crosshair on the screen to set the part of the screen.
- Cut an extra part of the screen while leaving the specific part using the cursor.
- Press the Esc key from the keyboard for existing the snipping tool.
- The captured part will get dark, simply hold the Space bar down and shift the darker part while dragging it via the snipping tool
Method: 5 Use Keyboard Shortcuts to Take Screenshot of Entire Window on Mac
- Press Shift + Command + 4 + Space from the keyboard simultaneously.
- It will change your cursor into a Camera icon.
- As soon as you take the screenshot, release your mouse or trackpad.
- Click the window or menu to capture your screen.
- You can avoid the Window’s shadow in your captured screen by holding the Option key.
- Press Esc to exist.

Method 6: Take a Screenshot of the Touch Bar
- Press Shift + Command + 6 keys simultaneously from your keyboard.
- It will capture the full Touch Bar screen.
- You can share it with others.
How to Change the Location for Saved Screenshots
When we capture a screenshot, it is saved to a desktop folder automatically by default on a MacBook, or iMac. You can easily locate them by determining the Desktop section in the Finder app, or via thumbnails of the screenshot on the desktop. However, if you can’t find them, you can locate them with the help of the following two methods;
- Press Command + F to access for Finder search window, and type Saved Screenshot in the search box.
- Open Spotlight by clicking the Spotlight icon from Mac’s menu bar, and get access to your captured screenshots.
Now, you are capable of saving your screenshots to your preferred location by following the given steps;
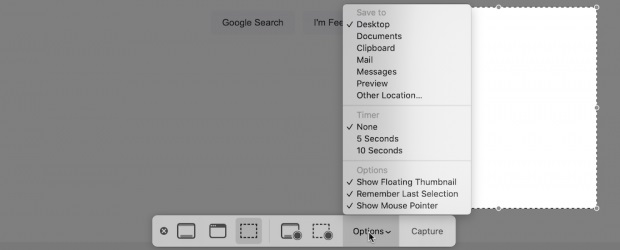
- Press Shift + Command + 5 to pull up the screenshots.
- Click the Additional Options icon, and select the ‘Save to’ option from the top of the drop-down menu.
- You can select your favorite location from the list i.e. desktop, documents, clipboard, and mail.
- If you are not satisfied with the available location list, click on the Other Location option to select a custom save location.
How to Configure Snipping Tool
You can configure the snipping tool settings such as setting a timer for 5 to 10 seconds. Likewise, you can add a screenshot folder to Touch Bar to get access to them easily without stroking multiple keys, if you have a Mac with Touch Bar. Follow the given steps.
- Go to Keyboard Setting using System Preferences.
- Open the drop-down menu, and select ‘App Controls’ while hovering your mouse pointer on the ‘Touch Bar Shows’ option.
- Click on the ‘Customize Control Strip’ option to open the icons of program shortcuts.
- Select the Screenshot app, and drag it to the Touch Bar.
Some Popular Alternatives of Snipping Tool for Mac
No doubt, Mac has an intuitive Snipping tool, but it has limited features and functionalities. We will give you details of some popular alternative snipping tools for Mac
Scribe
Scribe is the most powerful snipping tool that offers more than taking screenshots or recording vides. Use your web browser extension or desktop app to start the AI-powered tool. It will cut the complex processes into tiny-sized visuals, so the collaborative can understand them easily.
It offers drag-and drop option to add text or images to your screenshot, and save them as a video or image file on your system.
It is also available with a free plan and you can avail subscription plan for $23.
TinyTake
One of the impressive freeware snipping tools is for capturing screen or recording video within a few steps. It allows you to take screenshots in different styles such as specific portion, entire screen, or even images and videos using your webcam.
It offers 2GB free cloud storage for saving your screenshots and video recordings, or share with others easily. It is available for free, but you can avail subscription plan for $29.95 and use a lot of advanced features.
Flameshot
Flameshot with freeware and open-source capabilities is very simple to use. No doubt, you will find a plethora of customization tools for customizing the tool’s interface, keyboard shortcuts, button configurations, save settings, and so on. Unfortunately, it lacks lack of video recording feature.
Move to multiple amazing features i.e. add text, draw figures, highlight text, blur sections, and annotations. Everything is smartly moved to the endpoint and enables you to save your edited screenshot files on your system.
Markup Hero
The web-based tool is reliably used for taking screenshots, annotating, and uploading within a few steps. You can copy the links of screenshots and paste them in a blank canvas, and edit your screenshot on the fly.
Manage your control over keyboard shortcuts reliably using real-time email alerts that inform you about views, duplicates, or edits by others on your markup. You can use it free of charge, but also avail the subscription plan with $4.
Zight
Previously known as CloudApp is a feature-pack solution for taking screenshots and video recordings. Improve your functionality using the customization tools, and multiple advanced annotation tools i.e. text boxes, arrows, emojis, and shapes are there for your ease. The capability of adding voice-overs to recordings helps you to improve your editing process.
It is free of charge, and you can also avail subscription plan with $9.95
Bottom Lines
All-in-all, snipping on Mac using the built-in snipping tools is easier and simple to use. You can use keyboard shortcuts for capturing your screen in any style you want. But, if you require a little more than the built-in snipping tools are providing. You need to move some authentic alternative snipping tool that is available in the market for your ease.
FAQs
Q: How to snip on Mac and paste?
Copy the portion of the screen you want to capture by pressing Command + Control + Shift +4 or use the crosshair that appears on the screen and drag it on the selected area. Paste your copied screenshot to any other program.
Q: Is Mac has any snipping tool?
Yes, Mac has a built-in snipping tool that can be accessed using keyboard shortcuts. It helps you to take screenshots of the entire screen, select parts, and even a video recording option.
Q: What are the best alternative snipping tools for Macs?
1. Scribe
2. TinyTake
3. Flameshot
4. Markup Hero
5. Zight