
Are you a new Mac user? And want to know, how can take a screenshot on Mac. It is really easy and simple, as all types of Macs including modern Macs i.e. MacBook laptops, iMac all-in-ones, or Mac Mini, and Mac Studio desktops have three basic options for taking screenshots using keyboard shortcuts. Similarly, Touch Bar is the fourth option used by MacBook Pro developers, and you will find different options for easily saving, deleting, and opening the screenshot on Apple?s MacOS software.
here is a full list of methods and steps on how to take a screenshot on a Mac;
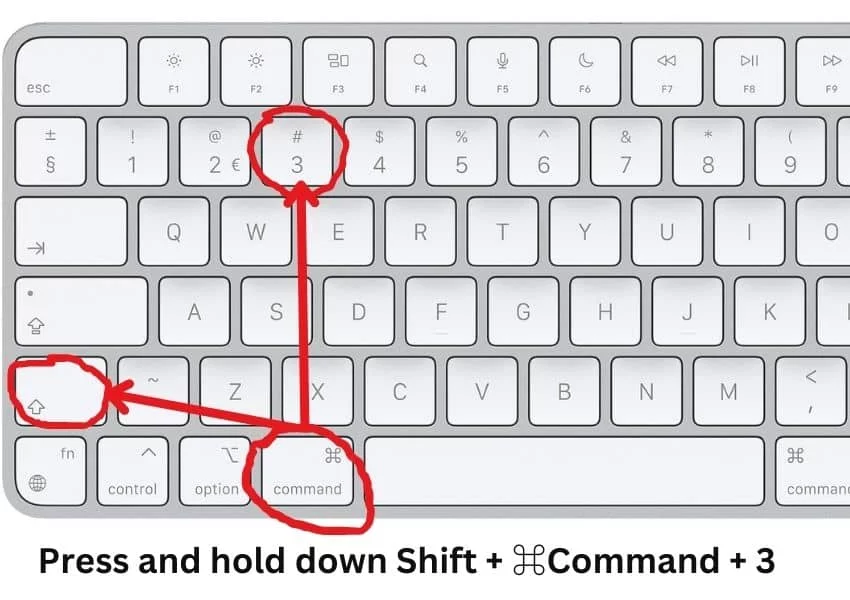
Method 1: Full-Screen Screenshot
You can take a full screenshot by following the given steps;
- Press and hold down Shift + ?Command + 3.
- The sound of the camera shutter will be heard with a flash on your screen.
- A thumbnail will appear briefly on the screen.
- If it appears, simply click it and make changes using editing options.
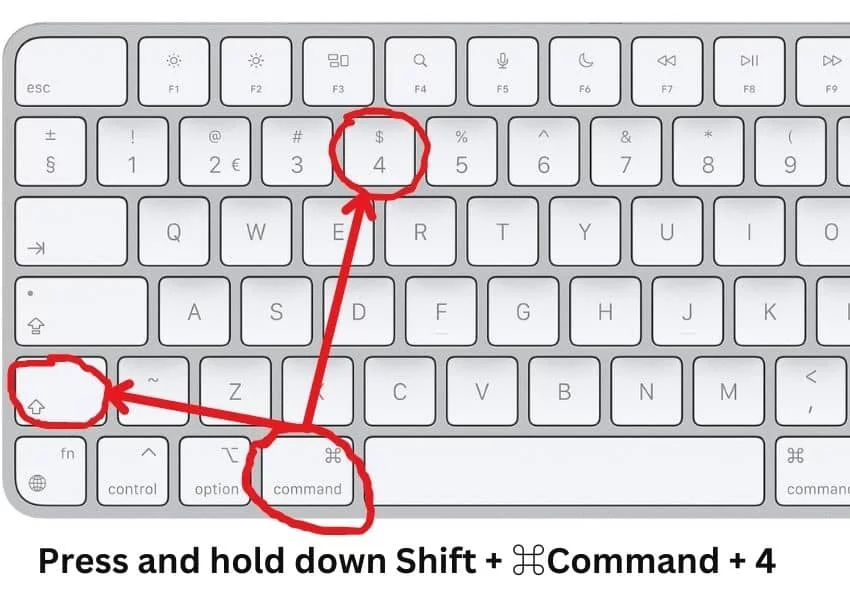
Method 2: Take a Specific Part of the Screen
- Press Shift + ?Command + 4.
- The mouse cursor will be changed into a crosshair, drag the crosshair to your selected area.
- Release your mouse button or trackpad, and take your required screenshot.
- You can cancel the process by pressing the Esc key.
- Press Shift + Command + 4 along with the spacebar, it will change the crosshair into the camera, hover the camera on the specific part, and click it.
- The screen was captured and has a grey border around it to show that it is saved.
- Now highlighted the area by dragging the crosshair, next press and hold down Spacebar. The area was locked into shape and size, but you can drag it to any other part of the screen.
- Release the Spacebar, and capture your screenshot.
- You can adjust the height and width of the screenshot. Simply press the Shift key and hold it down, adjust the height and width of the box, and use the mouse button or trackpad for taking screenshots.
Method 3: Use the Screenshot Menu
You can avail in-built Screenshot app for the latest version of MacOS i.e. Mojave, Catalina, Big Sur, Monterey, Ventura, and so on. You can easily screenshot using the app by following the given app;
- Open the app by pressing Shift + Command + 5.
- It will open a small menu panel at the bottom of the screen.
- On the left side of the panel, three icons are available for taking your screenshot; full screen, any specific section, or highlighted area. Select your required option and click it.
- On the right side, you will find two icons for recording video; full-screen recording, or highlighted section. Select anyone, and go for the recording process.
- You can take help from the ?Options? menu, as it assists you to save your screenshot, and the time taken to press for Capturing the screenshot i.e. 5- or 10- seconds delay to schedule capturing process.
- You can also turn on the Show Floating Thumbnail option by default using the Options menu. It offers a tiny thumbnail at the bottom of the screen when you take a screenshot. The screenshot saves to your system after the thumbnail disappears from the screen.
- You can click the thumbnail, and it will redirect you to a new window, here you can edit the screenshot i.e. add text to it, adjust the size and shape using the crop option, and share it using your Apple ID account.

Method 4: Take a Screenshot using Touch Bar
It is the best option for users, who are used to Windows and take screenshots using the Print screen option. The Touch Bar on Mac may be the best alternative to this. You need to follow the given options;
- Open your Apple menu; click on System Preferences, and next on Keyboard.
- Press Customize Control Strip option.
- Select the location for creating a screenshot button on the Touch Bar.
- Use the drag-and-drop option for placing the required button.
- It is the time to grab your screen using your Touch Bar.
- Tap to the screenshot button, it will open the screen capture menu.
- Tap on the ?Save To? option, in case of changing your location for saving screenshots.
- Select the part of the screen; you want to capture i.e. full screen, specific section, or a single window.
- Move your cursor to the part and take your screenshot.
Method 5: Record your Mac Screen
- Press Command + Shift + 5 keys altogether, and it will open a small toolbar at the bottom of the screen. It offers several buttons for different tasks i.e.
- Take a screenshot of the full screen.
- Take a specific part of the screen.
- Take a screenshot of the highlighted area.
- Record the entire screen.
- Record any specific part of the screen.
- Use the Options menu for customizing your screen.
- On selecting everything, just click the Capture option, and have your captured screen.
- You can click on the Record option for the recording screen, and click on the Stop option to stop the recording.
Method 6: Copy your Screenshot to the Clipboard
- Copy the screenshot to the clipboard by pressing the Control and holding it down.
- If you don?t want to save the screenshot in the image gallery, simply save it to the clipboard.
- You can paste it into a document i.e. Word or any photo editing app.
How to Locate the Mac Screenshot?
Screenshots save automatically on the desktop with the name Screen Shot, as it is set by default on your system. You can change the default location of screenshots. Simply follow the given steps for the purpose;
- Open your screenshot menu by pressing Shift + Command + 5.
- Select the ?Options? menu, and tap it to open.
- Select the ?Save To? option from the menu, and click on Pre-listed locations to choose any one.
- Otherwise, you have the option ?Other Locations?, it enables you to select the folder where you want to save your screenshot.
- In macOS Mojave or later, it is possible to schedule the saving of screenshots in the Screenshot app. You need to open the app, and press Shift + Command + 5 altogether.
- Apple TV app and some other such apps do have not the option to take screenshots. You can copy your required screen to the clipboard, press the Control key and hold down, and paste the screenshot on any other document.
Annotate Easily
Several Markup tools are available in Floating Thumbnail for annotating the screenshots. The Floating Thumbnail can be slipped by itself, or you can swipe it also. Click it and get access to the Markup View preview window to avail of the markup tools. Avail gave outcomes by right-clicking the Floating Thumbnail;
- Save your screenshot to any of your required locations i.e. desktop, document folder, or clipboard.
- It is possible to open the saved screenshot into Nail, Message, Preview, or Photos.
- Display in the Finder option.
- Remove the screenshot.
- Open into Markup preview.
- Save it where you want.
How to Print out Screenshots Using Preview?
Preview is the local image and PDF viewer used in Apple devices. It helps you to carry on your workflow reliably. It also offers a screenshot tool that enables the users to capture a full screen, a specific part, or a window. It offers the quick and auto-opening process of screenshots right in a new window. You can easily edit it using multiple editing tools, resize it, and add annotations also.
- Open the app menu and click on the File option.
- Click on the screenshot option, and select the option you want to capture i.e. full screen, specific section, or a window.
- Click on the Capture option to take your required screenshot.
- Open the screenshot while clicking on the Floating thumbnail, and you can edit, or save it to your preferred location.
How to Organize MacOS Screenshots
Taking screenshots has become one most vital part of our digital work, as we take screenshots for multiple purposes i.e. Gaming, office work, or any other such task. The screenshots are saved in your Downloads folder or desktop with the same name or style i.e. screenshot 2022-xx-xx at 22.40.25, and locating is difficult, especially when you?re MacOS is embedded with multiple other abbreviating filenames.
You can use the Finder option along with Preview, but it is also not very effective. It is better to use any image editor i.e. ?Photobook that enables you to rename, resize, and compress photos in bulk. The app offers a simple process for the purpose, such as using the drag and drop option for transferring screenshots to the app and clicking the ?Start? button. It will very quickly arrange your screenshots while renaming them into a folder.
How Share Screenshots from MacOS?
The sharing of screenshots using your MacOS is also a little bit difficult task. You can use the email address for the purpose, or upload on Dropshare, the best solution for sharing your screenshots or other files, as it connects multiple cloud apps offered by third parties. It helps you to share your screenshots exclusively while remaining the other sharing activities aside.
Third-party Screenshot apps for MacOS
If you are not interested in capturing screenshots using the built-in tools, simply avail yourself any of third-party app for the purpose. You will find multiple apps developed by third parties, as we are giving detail of some of them.
Lightshot
- Download the app on your MacOS, and press Command + Shift + 9 to launch it on your device.
- The screen got dark while giving the sign of taking a screenshot.
- Select the area of the screen for taking screenshots with the help of a mouse pointer.
- A highlighted area will appear, press Command + A for selecting the entire screen.
- A toolbar beside the highlighted area is available, it helps you to perform several tasks I.e. add text, lines, rectangles, arrows, and colors.
- Save your captured screen by pressing Command + S. You can save it to your selected location also.
Capto
Capto is also the best solution, especially, if you want to record the screen. It helps you to record on-screen videos, take screenshots, and also edit processes along with adding annotations. It also offers a voiceover instead of adding captions.
Yac
Yac is a combination of asynchronous voice and video messaging tools that offers quick services to share your content with your friends and colleagues. Simply record your message, attach your screen recording along with annotations, and hit the send option.
CleanShot X
It is also an unbeatable third?party app while tailoring with 50 different changes. It is the best screen-capturing app for Mac, as it offers all types of screen capturing including an entire screen, a window, a specific area, scrolling content, and even recording screen video or GIFs also. Before opening the app, it is better to hide all of the clutter from the screen, and next start your image capturing reliably along with editing, adding annotation, and so on.
Monosnap
It is a well-received snapshot tool while offering multiple editing tools i.e. annotation, video recording, drag & drop, blur feature, and so on. Make your captured area accurate using an 8x magnifier cropping tool. It is free of charge along with 2GB of free cloud storage.
Snagit
It is developed by Techsmith and offers a super customized interface. It enables you to capture text from images and paste it on an editor, and rearrange your components of images in a nice way, it is integrated with almost all big apps including Microsoft 365, Gmail, and so on.
Droplr
It is a high-feature pack tool, especially used by big business companies and enterprises. It offers high-resolution screen capturing as well as recording in a fool-proof secure environment.
Final Words
So friends, it is clear that taking screenshots on Mac is not as difficult, as some of us think. It is quite easy, especially with the addition of a screenshot and video capture menu on the MacBook. No doubt, multiple improvements are going on by Apple?s developers to make your workflow seamless. You can use any of the built-in options, or third-party apps for the purpose.
FAQs
How can I view my screenshot on Mac?
The captured screenshot is automatically saved on the desktop. Go to your desktop, and if you can?t. you can use the Finder for access to the required content on your Desktop.
How can I paste my screenshot on Mac?
If you can?t take a screenshot, it is better to copy the screenshot to the clipboard and paste it into any document file or photo editing app i.e. Word or Paint.
How can I disable Screenshots on Mac?
1. Open your System Preferences, and click on Security & Privacy option.
2. Select the Privacy option, go to Screen Recording, and insert a password to unlock the padlock.
3. A list of apps that use for recording screens will appear in front of you.
4. Disable any app from here you want.
How can I take a screenshot of any selected area?
Press Command + Shift + 4 and hold it down, it will be changed into a crosshair, drag the crosshair to your required place, and it will draw a rectangle around the specific area, click on the Capture option, and all is done.